The Sensors
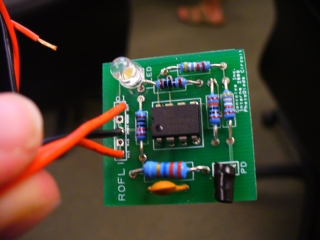
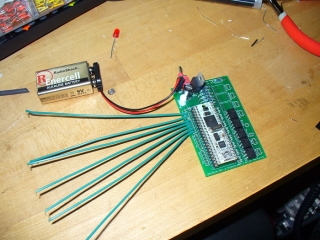
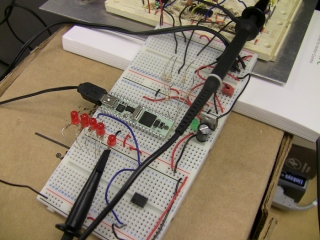
Our note-sensing technique is what makes DeepNote unique. Using photodiodes aimed at the 5 notes on the screen, we are able to pick up on the changes in light that are exhibited when a note passes through the sensors. A photodiode works just like a photovoltaic cell (solar panel), by turning absorbed light waves into voltage. Thus, a voltage spike is experienced when light increases. The photodiodes have an 8 nanosecond response time and a small viewing angle, making them ideal for accurate and speedy analysis of notes. Because the voltage generated by this light change is very small (on the scale of a few millivolts), circuitry is used to amplify the signal up to about 3 volts, remove as much noise as possible, and adjust the hysteresis. The result of all of this is a digital square wave where 3 volts indicates a note, and 0 volts indicates no note. The sensors are held in place by a sliding rack that allows them to be adjusted for different size televisions.
The Sensor-Guitar Connection
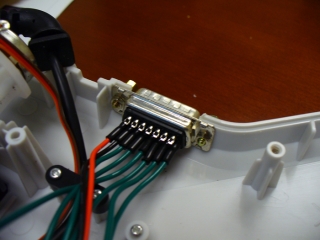
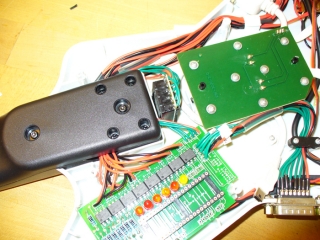
So now that we have all of these wonderful digital signals, how do we get them to the guitar? The rack and guitar are both equipped with standard 15 pin D-sub ports. A D-sub cable connects the two of them, and can be removed for storage, portability, or whatever else . A D-sub cable is simply a cable with several corresponding pins on each end. A wire runs through the cable for each pin, transmitting digital data in parallel. So, 5 of the pins transmit the colors from the sensors to the guitar (plus one extra wire for good measure), and 2 pins transmit power and ground from our circuitry in the guitar to the sensors (the sensor circuits need power and ground for their amplifiers). On the sensor end, the D-sub connector is wired to the sensors, and on the guitar end, it is wired into our control board.
The Parallax Propeller Chip
The parallax propeller propstick is the brain of DeepNote. It is an 8 core chip that runs at 80MHz. It processes all of the information using the code we wrote in both spin (its interpreted language), and assembly (a low-level CPU language.
The Power Source
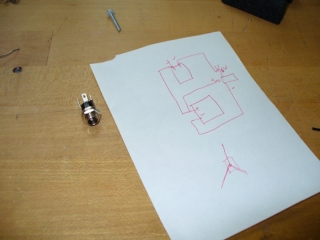
DeepNote can be powered by either a 9V battery, or a 5V wall adapter. A DC coaxial jack with a built in switch automatically disconnects battery power and switches to wall power when the plug is inserted. When disconected again, it will switch back to the battery.
The Power Conditioning Circuitry
Using a power regulator and a capacitor, the power circuitry first takes the power provided to it and converts it to 3.3V, the voltage required by the processor. Our guitar has both a 9V battery holster and a connection for a 5V wall adapter. A switch on the front of the guitar turns the processor (and consequently automatic mode) on or off by connecting and disconnecting the conditioning circuitry from ground. A front LED illuminates when power is flowing.
The Delay Switch
Because the distance between the sensors and the bottom of the screen will vary between televisions, our guitar utilizes a hexadecimal switch that allows a selection of the delay time ((0-15)* a multiplier). This switch has 5 connections, one common rail (3.3V), and 4 outputs: 1,2,4,8. By switching on or off those 4 outputs, 16 settings can be achieved. The propeller chip interprets the input and adjusts the delay accordingly.
The Relays and LEDs
Some time spent reverse engineering the x-plorer guitar revealed that buttons, the strum bar, and the whammy can be pressed virtually by bridging the “positive” and “negative” connections associated with the action. In some cases, a negative was shared amongst buttons. This is great because it means that we never have to feed any voltage into the existing guitar circuitry. By using solid-state relays (they work like a switch), we can close the connections when appropriate, thus imitating a button press, strum or whammy. When a button needs to be pressed, the appropriate pin on the processor enters “high mode” and sends a voltage to the relay, telling it to connect the appropriate terminals. Because of this method, the existing connections can still be left in tact, allowing the guitar to be played in manual mode. The pin that sends the “high signal” to the relay also sends it in parallel to an LED that illuminates when that action is being performed. This allows for debugging, and it makes it look really intense.
The Whammy and StarPower On/Off Switches
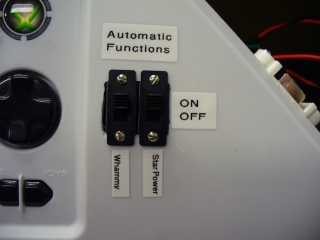
In autonomous mode, DeepNote will automatically whammy everything and attempt to activate star power at appropriate times. However, the automatic whammy starts to sound really annoying after a while, and the automatic star power may not be desired if the user wants to decide when to activate it. Thus, two switches were installed that allow these functions to be turned off or on when in automatic mode. They simply connect or disconnect the wire from the relay to the negative terminal of the star power and whammy contacts.
The Software and USB Connection
Naturally, the propeller needs some code to run! The code we wrote does a number of things:
- It analyzes the inputs, performs software filtering, applies the appropriate delay, and outputs the necessary button presses and strums.
- It constantly checks the state of the delay switch pins so the delay distance can be set as per the position of the dial
- It whammys at a constant rate
- It checks the notes it’s cleaned to determine when it should use star power. Then, it uses it when it feels the time is right.
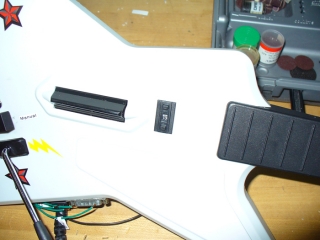
The propeller is programmed through a standard USB to mini-B USB cable. Inside our guitar we have a mini-B to B extension cable plugged into the processor, with the B side mounted in the side of the guitar. This gives us easy access to the programming port when we want to tweak something.
*Learn more about how the DeepNote Bot works in the videos section*
You guys have a serious leg up on your way to becoming Electrical Engineers. I would have loved to get this kind of internship last year before I got into college. Having a reason to code in ASM would have definitely given me more motivation to learn that stuff. Great Job on all of this by the way.
Where in living hell did you get the resources to tackle a project like this?! Did you do this at work or at home?
Dr. Singer was nice enough to provide us with most of what we used (see the team page)
Nice job. Next time though don’t you think you should give it robot fingers so that it can actually touch the keys. Then it could play on anybody’s system. Next time.
Looks like a pretty good way to get the notes detected! Well done! In terms of making the whole system streamlined, is that ever going to be possible? How about the filtering? Did you all come up with those filters by yourselves? Me thinks not…
I noticed that, in the early detection video, the bot’s LEDs would turn off during any held note.
Why was this and how did you correct the problem?
seems simple enough..my recommendation is make suction cups to stick to the tv (keep the sliders). but still, WAY COOL!
war6763: The system could theoretically be a bit more streamlined, but the processing circuity for the photodiodes must remain right next to the diodes, to prevent signal degradation. The filtering program was written by the those on the team page. The amplification circuit was designed with some outside help from an electrical engineer.
TheBlunderbuss: In those videos, the songs were in practice mode, and the notes weren’t actually being played. We were just detecting them. So when the holds weren’t hit, the notes disappeared, and sensor LEDs went off.
Hey awesome project guys
I have a few questions. It seems that you used only one photodiode for each fret, do you place these slightly below the target area (to avoid the rising fire animation)? if you did, then how do you make sure long notes are held? Does the robot hold down the frets until the next note is seen (I’m fairly certain this would work)? Or are the notes released as soon as the robot sees nothing?
How fast are you “moving” your whammy bar? I have a Wii guitar controller and if I have a 50 ms delay between up and down, star power won’t activate by tilting the guitar.
Awesome!!!
If you want to make this really advanced (not that this isn’t already) you could instead of using the sensors have a camera and some kind of image recognition. Don’t know what kind of camera eyes you’ll need for that but it would have to at least sync up with the refresh rate of the monitor in question.
Anyways, great job, bet you had tons of fun.
make it easier so like a kid could do it
This is truly an innovative project.
How did you use the photodiodes to detect notes that were extremely close together, as in insanely fast strums? Wouldn’t the photodiode read it as one continuous light stream?
Also, what about how fast the note moves down the screen. How did you account for that delay. If you played a song on easy, where the notes are moving real slow, would your program account for the delay?
That’s why we chose photodiodes with such a low response time (on the order of nanoseconds). Also, we’ve amplified the sensors just enough to pick up on the white part on the middle of the note, not the colored part around it. That helps it distinguish the notes. Finally, putting on hyperspeed helps a bit because it spaces the notes out.
Would you’s be so kind to actually sell me a bot ? i will pay approx $100? vidc how it looks i just want for xbox 360 :)
so please add me and we can talk
They are not for sale, sorry. Feel free to build your own, we have uploaded all the documentation needed.
would u be able to sell packages with all the items requred (no guitar) as i am not too much technologically smart to know the exact items and stuff :(
I’m afraid not. Even if we did, this project requires a fair amount of technical knowledge.
Jeremy,
Looking through the code, I couldn’t find how you registered a chord as one note. I hope this doesn’t seem trivial to you but with fast note hooks it’d be hard to read a chord as one strum without having it strum two or three times for each note right? Did you have issues with having the setup completely level? So how did you do it? whats the pseudo code of reading a chord?
Initially, we implemented a threshold value checker in our code to deal with chords. However, after implementing our metal sensor rack, it was no longer necessary because the sensors were perfectly aligned. We were able to remove the check to improve speed and to increase accuracy elsewhere. See line 477 where we simply check to see if the value is greater than 0.
Dear mechandizedrock.
I am vinnie from the netherlands. 18 years old.
And ive been looking for a xbox 360 guitar hero bot such as this.
Although is is so frikking hard to find a bot.
Some mate told me this website, but i am really, really bad with english and engineering. So if you guys would make me one, how much would it cost? Or is there any other way by hacking world tour?
Would like to get any help asap :)
Kind regards,
Vinnie Brouwer
[email protected]
Sorry Vinnie, but we are not selling bots. It simply takes too much time to make one. If you would like help building one, I can try to help you, and all the info is available on this site. I don’t know of any place where you can buy a bot.
Hey im trying to make a bot but its very complicated is there any way you can help me?
I can try to answer any questions you have. Just post them here or contact me via my website, jeremyblum.com.
Do you think you can make a video or something? Its confusing me. I’m not good with that tech stuff. Or just email me via [email protected]
You’ll need some tech knowledge to make this work. Let me know if you need help with some specific part.
Wow, too cool. I’ve created a hard-coded version, but I like what you did with the screen-watching capabilities.
//www.kickstarter.com/projects/1695785491/guitar-zero-hardware-mod-for-xbox-360-guitar-contr-0